The Ultimate Guide to Drill Point Countersinks: The Precision Solution for Countersinking
Countersinking, a fundamental woodworking technique, involves creating tapered holes to accommodate screws or bolts below the surface, ensuring a flush and professional finish. Drill point countersinks, dedicated tools specifically designed for countersinking, offer unparalleled precision and efficiency.
What is a Drill Point Countersink?
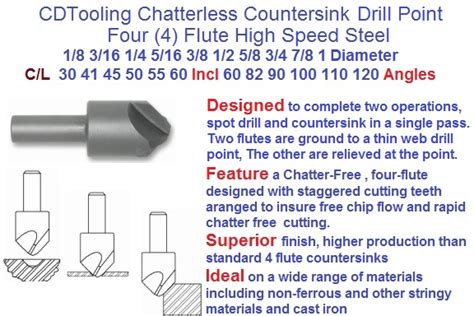
A drill point countersink is a cutting tool featuring a pointed tip and a spiral flute, which allows it to drill while countersinking simultaneously. Unlike conventional countersinks that require a separate drilling operation, drill point countersinks streamline the process, saving time and effort.
Benefits of Drill Point Countersinks
-
Improved Aesthetics: Drill point countersinks produce clean and consistent countersinks, enhancing the overall appearance of the project.
-
Increased Screw Strength: Countersinking screws below the surface reduces potential damage to the screw and improves the strength of the joint.
-
Increased Countersinking Accuracy: The pointed tip ensures precise countersinking, eliminating the risk of uneven or oversized holes.
-
Reduced Tool Changeover: Drill point countersinks eliminate the need for separate drilling and countersinking operations, reducing downtime.
-
Increased Productivity: The combination of drilling and countersinking in one step enhances efficiency, allowing for faster completion of projects.
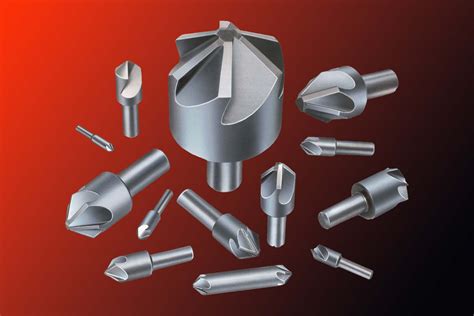
Different Types of Drill Point Countersinks
Drill point countersinks come in various types, each designed for specific applications:
-
Standard Drill Point Countersinks: Suitable for general-purpose countersinking of softwoods and hardwoods.
-
Self-Centering Drill Point Countersinks: Feature a pilot tip that guides the countersink and ensures perfect hole centering.
-
Adjustable Drill Point Countersinks: Allow for fine-tuning of the countersink depth, ideal for precise countersinking requirements.
-
Chamfering Drill Point Countersinks: Not only countersink but also chamfer the edge of the hole, creating a clean and polished finish.
-
Specialty Drill Point Countersinks: Designed for specific materials such as metal, plastic, or composite materials.
Selecting the Right Drill Point Countersink
Choosing the right drill point countersink depends on the material being worked with, the size of the countersink required, and the desired depth. Here's a table to guide your selection:
| Material |
Countersink Size |
Depth |
| Softwoods |
1/4" - 3/4" |
Shallow |
| Hardwoods |
3/16" - 5/8" |
Medium |
| Metals |
1/8" - 1/2" |
Deep |
| Plastics |
1/8" - 3/16" |
Shallow |
| Composites |
1/4" - 1/2" |
Medium |
Effective Strategies for Using Drill Point Countersinks
-
Choose the right size and type: Determine the appropriate countersink size and type based on the material and application.
-
Secure the workpiece: Clamp or secure the workpiece firmly to prevent movement during operation.
-
Start slowly and increase speed: Begin drilling at a low speed and gradually increase it as the countersink takes hold.
-
Apply moderate pressure: Avoid excessive pressure, as it can cause the countersink to slip or damage the material.
-
Maintain a perpendicular angle: Hold the drill perpendicular to the workpiece to ensure a clean and centered countersink.
-
Clear the cuttings: Occasionally remove the drill point countersink to clear away any sawdust or debris.
-
Avoid overloading: Do not attempt to countersink excessively large holes with a small countersink.
Step-by-Step Approach to Using a Drill Point Countersink
-
Mark the countersink location: Use a pencil or marking tool to indicate the position of the countersink.
-
Choose the appropriate countersink: Select the right size and type of drill point countersink based on the material and application.
-
Install the countersink: Secure the countersink in the drill chuck or driver and ensure it is firmly tightened.
-
Position the countersink: Align the countersink with the marked location and hold it perpendicular to the workpiece.
-
Begin drilling: Start drilling at a low speed and gradually increase the speed as the countersink takes hold.
-
Maintain pressure: Apply moderate pressure to the countersink while drilling.
-
Check the depth: Regularly check the countersink depth to ensure it aligns with the desired depth.
-
Clear the cuttings: Periodically remove the countersink from the hole to clear away any sawdust or debris.
-
Finish the countersink: Once the desired depth is reached, release the pressure and slowly withdraw the countersink.
FAQs about Drill Point Countersinks
- What is the difference between a drill point countersink and a regular countersink?
A drill point countersink combines drilling and countersinking in one step, while a regular countersink requires a separate drilling operation.
- Can I use a drill point countersink on metal?
Yes, there are drill point countersinks specifically designed for metalworking applications.

- How do I choose the right size drill point countersink?
The size of the countersink should be based on the diameter of the screw or bolt being used.
- How deep should I countersink a screw?
Countersinking depth should be slightly below the surface of the workpiece, ensuring the screw sits flush with the surface.
- Can I use a drill point countersink for decorative purposes?
Yes, drill point countersinks can be used to create decorative countersinks, such as chamfering or fluting the edges of holes.
- How do I maintain a drill point countersink?
Regularly clean and sharpen the drill point countersink to ensure optimal performance.
Humorous Stories and Lessons Learned
- The Case of the Misaligned Countersink:
In one infamous incident, a carpenter attempted to countersink a screw using a drill point countersink. However, due to an error in alignment, the countersink slipped and created a deep scratch on the surrounding wood. The carpenter, upon realizing his mistake, exclaimed, "Well, that's one way to add character to the project!"
-
Lesson Learned: Always carefully align the drill point countersink before drilling to avoid any mishaps.
- The Countersinking Saga:
Once upon a time, a DIY enthusiast embarked on a ambitious project involving hundreds of countersunk screws. After hours of laboriously countersinking each hole individually, the enthusiast realized that they had been using the wrong size drill point countersink, resulting in oversized and unsightly countersinks. "If only I had checked the countersink size beforehand," lamented the hapless homeowner.
-
Lesson Learned: Always select the appropriate drill point countersink size based on the material and application.
- The Bolt from the Sky:
In a particularly peculiar incident, a construction worker was using a drill point countersink on a scaffold high above the ground. As the worker countersunk a hole, the bolt they were inserting unexpectedly shot out and flew into the sky. The bewildered worker watched in disbelief as the bolt sailed over the roof and disappeared into the horizon. "Well, that's one way to finish the job quickly," muttered the worker.
-
Lesson Learned: Always wear safety glasses when using drill point countersinks to avoid any projectiles.
Tables
Table 1: Countersink Sizes for Common Screw Sizes
| Screw Size (Diameter) |
Countersink Size |
| #6 |
1/4" |
| #8 |
5/16" |
| #10 |
3/8" |
| #12 |
1/2" |
| #14 |
9/16" |
Table 2: Material Compatibility for Drill Point Countersinks
| Material |
Countersink Type |
| Softwoods |
Standard, Self-Centering |
| Hardwoods |
Standard, Self-Centering, Adjustable |
| Metals |
Self-Centering, Adjustable, Chamfering |
| Plastics |
Standard, Self-Centering |
| Composites |
Standard, Self-Centering, Chamfering |
Table 3: Drill Point Countersink Manufacturers and Models
| Manufacturer |
Model |
Features |
| Irwin |
Speedbor Max |
Fast and precise countersinking |
| Dewalt |
DWC100 |
Adjustable countersink depth |
| Bosch |
X-Lock |
Self-centering design |
| Makita |
XPH06 |
Chamfering and countersinking capabilities |
| Milwaukee |
2621-20 |
Durable construction and ergonomic design |

